Posts

Showing posts from November, 2022

Christmas Accordion Cards ~ 5 Minute Monday Card 3

Image
  This Accordion Christmas Card features the Snowman Magic Bundle. A Wonderful Snowflake floats behind the adorable little snowman.  The card background features beautiful snowflakes from the Storybook Gnomes Designer Series Paper pack.   View the Card Cutting Measurements for this card Shop Now Become a Discount Shopper Contact Me

Christmas Accordion Cards ~ 5 Minute Monday Card 2

Image
  The Jolly Santa featured on this Accordion card front is from the ( retired ) Jolly Santa stamp set.  I attached him with a wobbler ~ so he's wobbling around like a bowl full of jelly!  The background paper is from the Santa Express Designer Paper pack.  View the card cutting measurements for this card Shop Now Become a Discount Shopper Contact Me

Christmas Accordion Cards ~ 5 Minute Monday

Image
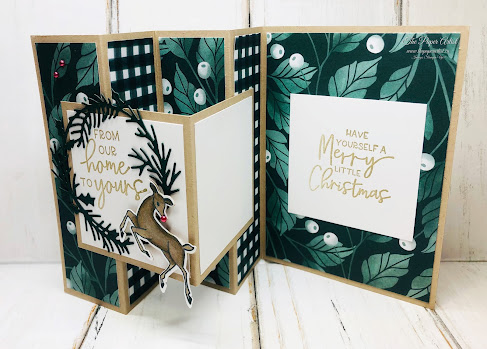
  Today's 5 Minute Monday features the Peaceful Deer stamp set & punch.  This set has been an all time favorite of mine and will still be getting used on my card fronts for many occasions yet to come. That beautiful background paper is from the Fitting Florets Designer Paper pack.  Much like the Peaceful Deer Stamp set,  it's completely versatile for many different occasions.  So here's some quick measurements for today's card. Supplies:   Peaceful Deer Stamp Set &  Deer Builder Punch Fitting Florets Designer Paper Framed & Festive Stamp Set Wreath Die ~ I used Sparkle of the Season ( retired ), currently Cottage Wreaths is available.  Festive Pearls Crumb Cake Cardstock Basic White Cardstock All products are linked above for easy shopping.  Cutting Measurements: Crumb Cake Cardstock ~ 5 1/4 x 11  Scored @ 4, 5 3/4, 7 1/2, 9 1/4 Crumb Cake Cardstock ~ 3 x 6  Scored @ 3 (on the long side ) Designer Paper ~ 1 1/2 x 5 1/4...

Slim Line Card ~ Santa Express

Image
  We created this card yesterday during Coffee & Cards to show how easy it is to create a card using designer paper.   This example uses the "Santa Express" designer paper. This slice of background paper worked perfectly for a slim line card!  The images were just cut from another piece of the same paper pack. The greeting was actually from last months Paper Pumpkin kit.   Any Christmas greetings or sentiments could be used for this card. 

Slim Line Easel (type) card ~ Christmas Barn

Image
  Today I created this slim line Easel type card with the intentions to teach a future tutorial.  The design is really not as difficult as you might think it is, just a few cut and score lines.  I used the Christmas Barn stamps & dies to decorate the layout, however you could many different stamp sets or images with this layout.  I have a few more examples that I will share in the next few days. These will show how versatile the card layout is.   It stands up beautifully and has plenty of room for a sentiment and message on the inside panel.  The card fits into a standard business size envelope. 

This or That?! ~ Opinions please!

Image
  Playing with the Art Gallery Bundle, I created these two cards ~ Which do you like better?  The Dots Die Cut background or the embossed background? Let me know in the comments below 👇 Thanks so much...

3D Storybook Box Card ~ Trees For Sale

Image
 

5 Minute Monday ~ Beautiful Christmas Card featuring any paper or stamps!

Image
  Today's 5 Minute Monday tutorial works up to be this beautiful Christmas card.  I've used the  Framed & Festive stamp set for the Greeting & Sentiment. Designer paper from the Storybook Gnomes paper pack, and Wonderful Snowflakes!!  Click to watch video tutorial! ☝ Supplies Used to Create this Card & Envelope: Framed & Festive Stamp Set Storybook Gnomes Designer Paper Pool Party Cardstock Basic White Cardstock Basic White Envelopes Starry Sky Ink Pad Wonderful Snowflakes Iridescent Rhinestones Pool Party Sheer Ribbon Cutting Measurements:  Pool Party Cardstock - 4 1/4 x 11 ~ Scored @ 5 1/2  3 1/4 x 2 1/4  Basic White Cardstock - 4 x 5 1/4  2 x 3 Designer Series Paper - 4 3/4 x 3 3/4 (cut diagonally from corner to corner )  1/2 x 5  5 3/4 x 2 1/4  Cut pieces and follow along with the video!  Above is a variation of today's card using a different section of paper from the same Storybook Gnomes paper pack. A few...

Good Things Paper Pumpkin Kit ~ PLUS an Add On!

Image
  Good Things Paper Pumpkin Kit   Create fun gift card holders to help you celebrate your special occasions all year long! Personalize each gift with these reversible boxes and paper bands for a unique design every time.  This kit comes with enough supplies for you to make 16 different gift card holders—2 each of 8 designs. It also has an all-occasion stamp set and enough paper pieces to make your craft really pop!  No matter what the occasion or who the recipient is, this is a coordinated paper craft that everyone will love and appreciate!  Plus, this month you can take your crafting even further with a special add-on! Give a gift card and a personalized card with the Good Things Cards & Envelopes add-on .  You get 16 cards (4 each of 4 designs) and 16 coordinating envelopes. Add-ons are live during the subscription period but will only be available while supplies last, so don’t wait!  Create a fun, personalized card for any celebration with the G...

Beautiful card created from a childhood Christmas memory!

Image
  I've been working on a layout for this card, and though I know it just looks like your average card using the Christmas Barn Bundle....  It is not average.  Nor is it the actual card or stamp set that I had in mind when I started to design this project.  The layout for this card first came to light while thinking about some favorite Christmas Eve memories from my childhood...  Remembering warm toasty evenings by the fire on the farm, while snowflakes fell outside.  The anticipation and excitement waiting for Santa's long awaited arrival.  'Twas The Night Before Christmas' was always read before bed. The pages of Christmas story books are always decorated so festively, and create such an element of wonder about the adventures yet to unfold inside the cover. This is the feeling that I was trying to capture in the creation of this card.  Probably no where near that dramatic as I am neither an writer or an illustrator.  Open the card front and ...

Adorable Gnome Holiday Gift Tags

Image
  These Gnome tags are completely adorable and super quick to create. They are going to look amazing on your holiday gifts!   Not only these gift tags easy to make, they are also a "Scrap Buster".  They are an amazing use of scraps of cardstock or designer paper.  The first set of tags used up some retired checkered paper that I absolutely love, scraps of grey cardstock, a sparkly white cardstock ( white will be just fine ), some Pale Papaya cardstock for the little Gnome noses.   The Gnomes were pieced together on a piece of craft cardstock cut at 2 x 4 inches. I used a retired tag topper punch.  You may have a punch or a die for tags, however you really don't have to have one. Just cut the tag at the required measurements.  You could even use a corner rounder.  You will require the Gnome Dies to create these tags. These dies are available to order from my Online Store . This set of tags used "Santa Express" designer paper.  Really tho...

5 Minute Monday ~ Gnome for the Holidays

Image
Today's 5 Minute Monday card tutorial features the Gnome Dies from Stampin' Up. They are available as a stand alone or in a the Storybook Gnomes bundle or suite .  I purchased this set quite sometime ago, and I made a storybook fold gnome card and... well that was about it. I figure it is about time I get some use out of them.  So were are at least going to use the Gnome dies today. Supplies for this card: Gnome Dies  Real Red Cardstock Santa Express Designer Paper Vellum Cardstock Wonderful Snowflake Christmas Greeting Stamp Basic Rhinestones/Gems Winter Embossing Folder Cutting Measurements: Real Red Cardstock - 8 1/2 x 5 1/2  Scored @ 4 1/4  Designer Paper 1 - 4 1/2 x 2 Designer Paper 2 - 3 1/2 x 1 3/4  Plus a scrap for the gnome hat Basic White Cardstock - 4 1/4 x 5  ( cut 2 )  Scrap for the gnome beard Scrap for Greeting Vellum Circle - 3 inch diameter Basic Black Scraps for Gnome Feet Pale Papaya Scrap for Gnome nose Instructions: Cut ...

Snowman Magic ~ Card 7 ~ Exclusive to the Paper Adventures Newsletter

Image
  Card 7 in the Snowman Magic Series remains a bit of a mystery... unless you are a Paper Adventures subscriber!  If you are then the tutorial for this card will be landing in your email box shortly!  Its quick, easy and brilliant, with a bit of a snowy blizzard! Will be a perfect card to give to everyone on your list this year!  If you move fast.... there is still time to get on the Paper Adventures mailing list ( time is ticking ). You're going to love it! 

Sweet Strawberry Easel Card ~ Requested Tutorial

Image
This sweet little Strawberry Easel Card was requested, so I figured why not share it with everyone. If you have the retired Sweet Strawberry Bundle, it's a "sweet" card to make ~ if not, it can easily be converted and used with a stamp set or bundle that you have.  Enjoy!  Sweet Strawberry Easel Card PDF Tutorial To view this season's amazing papercraft products ~ visit my shop by clicking below 👇 Shop Now Become a Discount Shopper Contact Me  

Perched in a Tree ~ Quick & Easy Birthday Card

Image
  Super Pretty Card, right? Give it a try... Supplies Used to Create this Card: Perched in a Tree Bundle Fitting Florets Designer Paper Balmy Blue Cardstock Balmy Blue Ink Pad   Basic Grey Ink Pad Water Painter Wink of Stella Festive Pearls Basic White Cardstock Card Cutting Measurements:  Balmy Blue Cardstock - 8 1/2 x 5 1/2  Scored @ 4 1/4  Basic White Cardstock - 4 x 5 1/4 ( cut 2 ) Scraps for stamping Designer Paper - 4 x 5 1/4  Instructions: Cut & Score Card Pieces. Using one of the Basic White Layers, center the large tree die and cut.  Attach the DSP on the card front.  Using dimensionals, attach the die cut tree layer to over top of the DSP layer. Stamp a bird and a branch using Memento Black Ink. Dap a bit of Balmy Blue Ink onto a stamp block. Using the water painter, add a drop of water into the ink on the stamp block.   On the other side of the stamp block dab some Basic Grey Ink and add a drop of water.  Using this a...